瓷砖的地图编辑器是一个伟大的工具,用于创建游戏水平和瓷砖地图。瓷砖的应用程序是用C + +, Qt应用程序框架的帮助下,它是免费的。它允许开发人员创建正交以及等距瓷砖的地图。地图被保存为TMX文件是基于XML的格式,所以他们很容易阅读,他们的工作与不同的游戏引擎。
瓷砖官方网站:
http://www.mapeditor.org/
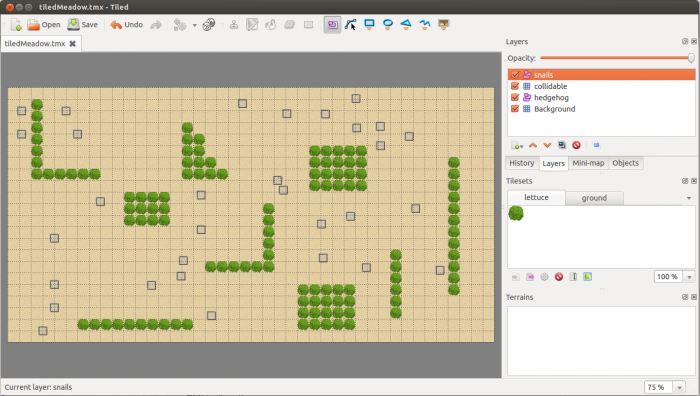
图1 :瓷砖的地图编辑器
TMX地图已经支持许多不同的游戏引擎,如:
Cocos2D中
iPhone的cocos2d
的Cocos2D - HTML5
AndEngine
melonJS
sprite.js
Unity 3D的
完整的列表可以在以下地址找到:
https://github.com/bjorn/tiled/wiki/Support-for-TMX-maps
您可以随时安装瓷砖的最新版本的地图编辑器,通过其官方网站的安装指南。瓷砖的应用程序应该在最流行的操作系统:
视窗
的Mac OS
Linux操作系统: Ubuntu的, Fedora的, openSUSE和CentOS的
创建TMX地图
创建新的地图和水平是很容易的瓷砖。下面的教程将介绍如何创建地图和使用一些花哨的瓷砖功能。因为我们使用的瓷砖,我们将在我们的示例应用程序RunSnailRun使用创建的应用程序,我们作为一个例子。
首先,所有打开的瓷砖并点击“新建”按钮,在左上角。会弹出一个窗口,您的新的地图设置。
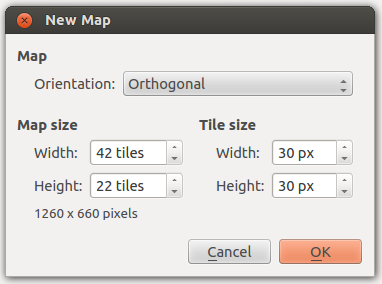
图2:新地图菜单
您可以设置多少瓷砖地图应该有多大,这些砖应。你应该考虑,并非所有的地图大小是可能的,你应该在开始写你的游戏设计地图。
在RunSnailRun ,我们用地图的大小42x22的瓷砖。这是1260x660像素。我们设计留有一定的空间填充和显示地图区域外的游戏标志。你点击“确定”后,你会看到一个新的瓷砖地图:
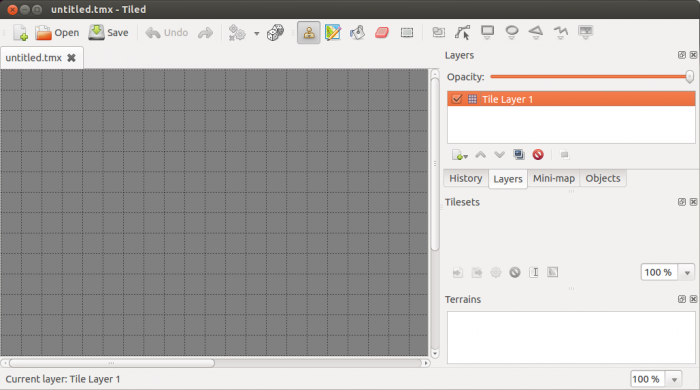
图3 :新的瓷砖地图
现在,您需要填写地图tilesets (图像)和对象。正如在cocos2d -x和大多数图形程序建立在瓷砖使用层的地图。最好的办法是使用层来收集所有的相同tilesets或所有对象共享相同的属性。例如我们RunSnailRun的地图为背景的层和其他层的碰撞元件(生菜) 。蜗牛和刺猬是不同的类型,它们是对象。
起步时,在第一层已创建。通常它的名字是:瓷砖层1 。您可以更改的名称,双击就可以了。之后将其更改为“背景”例如,你可以启动填补它。要做到这一点,你需要导入一些tilesets ,这是只是一些影像。
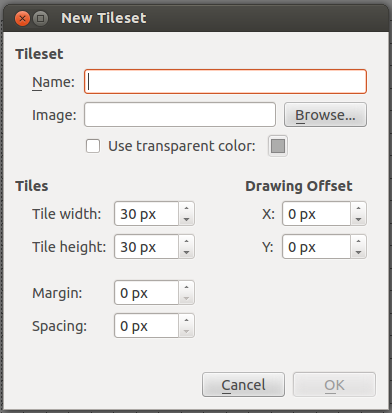
打开地图菜单,然后单击“新地形设置” 。
单击“浏览” ,找到要添加的图像。
单击“确定” 。
在右侧在Tilesets面板中,你会看到你的形象是进口。现在,您可以选择瓷砖,并将它们放置在地图上。
在顶部面板上,你会发现很多有用的选项,如:
邮票刷:此选项将导致放置在地图上只有一个地形设置。
铲斗填充工具:使用该选项设置指定的地形设置,将填补整个地图。
橡皮擦:这将删除所选的瓷砖。
矩形选择:你可以用它来选择一个区域,此区域内的所有修改将仅应用于
在您创建的背景,你也可以在地图上添加一些碰撞对象,所以玩家将无法在地图上四处走所有。为此,您可以在两个方面。在第一种方法中,您将在其中放置所有tilesets如岩石,河流,树木,将发生碰撞,你可以创建一个可碰撞层。的cocos2d - x可以读取从指定的层和瓷砖的位置,你可以检查,如果玩家想要移动到发生碰撞的瓷砖,你能阻止他。
另一种方法是创建一个层,每一种类型的地形,所以会有一层一层岩石等树木,然后,您将创建另一个单独的层与透明的地形设置。您可以指定哪些瓷砖是不是划线通过放置透明tilesets的这些瓷砖的球员。
在RunSnailRun有是只有一种类型的碰撞对象,莴苣。这就是为什么我们决定将不会有额外的层。我们创建了一个级别,称为“发生碰撞” ,里面的生菜放在这个水平。
正如之前所提到的,蜗牛和刺猬的对象。这意味着它们不显示图像,但它们存储的位置和一些基本的元素属性。在我们的应用中,我们在地图上放置的蜗牛对象和刺猬的对象,然后使用的Cocos2D -X ,我们读到了他们的地位和创造精灵。
为了创建一个对象层瓷砖,你需要打开图层菜单,然后点击“添加对象层” 。您现在设置对象层的名称。在我们的例子中,我们创建了两个对象层,一个蜗牛和其他的刺猬。创建对象层后,你可以创建对象。现在它应该看起来像这样:
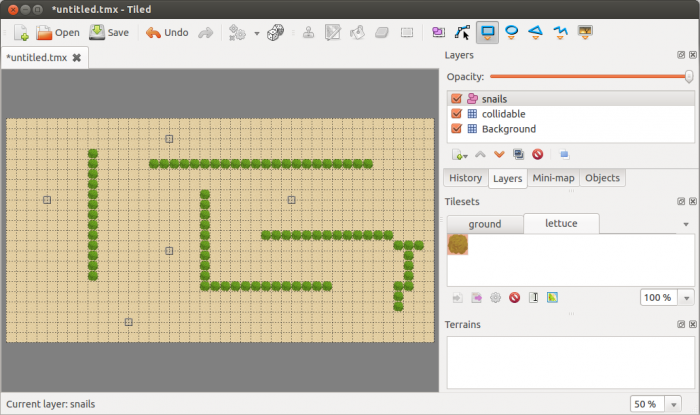
图4 :瓷砖组成的两个瓷砖层和对象层创建的地图
你现在只需要保存地图,并把它放在你的游戏文件夹内。
在cocos2d -X使用TMX地图
在cocos2d -X有一个特殊的类,允许你加载地图的TMX文件。此外,这个类有一些额外的功能,协助处理TMX地图属性。它可以访问层,单一电网和阅读他们的属性。下面是一个代码片段从RunSnailRun应用程序如何加载地图的瓷砖应用程序所产生的:
classes.maps.TiledMeadow = cc.TMXTiledMap.extend ({
构造函数:函数( ) {
this._super ( ) ;
this.initWithTMXFile ( “图像/ tiledMeadow.tmx ”的) ​​;
}
});
VAR TiledMap类=的新classes.maps.TiledMeadow ( ) ;
正如你可以看到的TiledMeadow类扩展TMXTiledMap的和创建时加载的tiledMeadow.tmx文件。
当你添加一个的TiledMap类对象的层创建的地图,它会被显示,但只有瓷砖层将显示。如蜗牛的对象层不会出现,也不会有任何机制检查对生菜的碰撞。你必须自己做。下面是我们如何在我们的示例应用程序中都做到了。
当我们加载了TMX文件,我们可以使用一些现有的函数来读取地图属性。例如,我们可以读取所有碰撞瓷砖和反映它们的创建矩形。
initObstacles :函数( ) {
this.obstacles = [];
VAR mapWidth = this.getMapSize () 。宽度;
VAR mapHeight = this.getMapSize () 。高度;
VAR tileWidth = this.getTileSize ( ) 。宽度;
VAR tileHeight = this.getTileSize () 。高度;
collidableLayer = this.getLayer ( “发生碰撞” ) ;
VAR I,J ;
就(i = 0 ; J < mapWidth 。我+ +) {
(J = 0 J < mapHeight “ J + +) {
VAR tileCoord : =新cc.Point ( I,J) ;
VAR , GID = collidableLayer.getTileGIDAt ( tileCoord ) ;
( GID ) {
VAR tileXPositon = I * tileWidth ;
tileYPosition = ( mapHeight * tileHeight ) - ( ( j +1)的* tileHeight ) ;
反应cc.rect ( tileXPositon tileYPosition , tileWidth tileHeight ) ;
this.obstacles.push (反应) ;
}
}
}
}
的Cocos2D -X允许您访问任何层从地图上只是通过调用用请求()函数要检查该层的名称。您还可以访问的网格层内使用getTileGIDAt ()函数,你必须通过电网的位置。
我们遍历整个地图,并使用上述功能,我们检查“发生碰撞”瓷砖。在发现每发生碰撞瓷砖之后,我们创建的矩形稍后会被用于碰撞检测。
使用类似的方法,我们所有的蜗牛的位置。下面的代码片段:
initSnails :函数( ) {
如果( this.tiledMap ) {
变种objectGroupSnails = this.tiledMap.getObjectGroup ( “蜗牛” ) ;
变种objectSnails = objectGroupSnails.getObjects ();
this.numberOfSnails = objectSnails.length ;
VAR = ;
objectSnails.forEach (的功能( objectSnail ) {
VAR蜗牛=的新classes.sprites.Snail ( ) ;
snail.setPosition (新cc.Point ( objectSnail.x , objectSnail.y ) ) ;
that.snails.push (蜗牛) ;
that.addChild (蜗牛,1 ) ;
});
}
}
这一次,我们使用的getObjectGroup ()函数来访问组包含所有的蜗牛。我们遍历每个蜗牛从这个名单。对于每一个蜗牛,我们读到它的x和y参数参照平铺地图上的位置,并创建一个精灵,并放置在同一位置上的cocos2d - x层。以同样的方式,我们也把刺猬的cocos2d - x层。
碰撞检测
现在根据自己的位置上定义由瓷砖的TMX地图显示所有的蜗牛和刺猬。接下来的问题是,所有这些动物时,会开始移动,他们会走的地方,他们想要的。他们将走进对方,什么都不会发生。我们需要某种形式的冲突检测机制。这个问题已经在前面的文章( Cocos2x - HTML5游戏框架在Tizen的应用:后续) ,但我会重复自己为了文章的一致性。我也将延长新病例的碰撞检测。
在地图上移动对象时,既然我们已经有了矩形反映碰撞对象(生菜) ,我们可以很容易地创建矩形蜗牛和刺猬,我们可以使用所有这些矩形检查,如果他们彼此相交。在游戏主循环在物体运动过程中,我们可以检查,如果这些矩形碰撞,触发一些动作,例如,如果蜗牛矩形将要移动到生菜矩形,我们可以阻止它。这是什么更新的函数看起来像在RunSnailRun应用的:
更新:函数(DT) {
VAR = ;
this.moveAndCheckForObstacles ( this.hedgehog , DT) ;
this.snails.forEach (功能(蜗牛) {
that.moveAndCheckForObstacles (蜗牛, DT ) ;
});
this.collisionDetection ( ) ;
}
正如你可以看到,我们尝试移动刺猬和蜗牛,我们检查,如果他们碰到任何障碍,在这种情况下是棵生菜。为了检查一个对象运行的障碍,我们使用的moveAndCheckForObstacles功能:
moveAndCheckForObstacles功能(对象, DT ) {
VAR newPosition = object.move (DT this.keyboardArrows ) ;
newReactangle = cc.rect ( 2 newPosition.x - 物件。 / 2 , newPosition.y 2 - “ object.height / 2,物件。 4 , object.height - 4 ) ;
,如果( ! this.isCollisionInArray ( newReactangle this.tiledMap.obstacles ) ) {
object.setPosition ( newPosition ) ;
}
}
这个功能是非常简单的工作原理如下:
它告诉对象来计算新的位置。
它创建了一个新的矩形,使用所获取的位置,确定这个对象后,将其运动。
它调用isCollisionInArray的函数来检查,如果这个新的矩形碰撞在一个数组中(这是在这种情况下,所有的首领生菜TMX地图被加载时创建的数组)定义的任何矩形。
如果没有碰撞,它设置对象的新位置。
的isCollisionInArray功能需要两个参数:一个对象和数组。它遍历数组,并检查是否通过对象调用的cocos2d -x的函数cc.rectIntersectsRect阵列碰撞的任何项目。它看起来像这样:
isCollisionInArray :功能(项目阵列) {
为(变种I = 0 ; < array.length ; + +) {
( cc.rectIntersectsRect (项目,数组[I] )){
返回true ;
}
}
返回false ;
}
使用瓷砖的应用程序中添加的对象层的所有对象将碰撞对棵生菜。你可以改变位置的生菜,所有这些机制应仍能正常工作。
总结
瓷砖的地图编辑器是一个非常有用的和简单的工具,可以让你创建TMX地图。您可以创建对象和对象和层定义的属性,使用这些属性在游戏引擎中,如Cocos2x HTML5 。如果您正在创建游戏应用程序,你应该考虑使用瓷砖的应用。
文件附件:
[size=0.9333em]runsnailrun.zip
以上为谷歌翻译结果
以下为原文,不懂得友友可以对照一下:
IntroductionTiled Map Editor is a great tool for creating game levels and tiled maps. The Tiled application is written in C++, with the help of the Qt application framework and it is free. It allows the developer to create orthogonal as well as isometric tiled maps. Maps are saved as TMX files which are just XML-based formats, so they are easy to read and they work with varying game engines. The official Tiled web site: Fig 1: Tiled Map Editor TMX maps are already supported by many different game engines such as: - Cocos2d
- Cocos2d-iPhone
- Cocos2d-html5
- AndEngine
- melonJS
- sprite.js
- Unity 3D
The full list can be found under the following address: You can always install the newest version of Tiled Map Editor by going to its official website and following the installation guides. The Tiled application should work on most popular operating systems: - Windows
- Mac OS
- Linux: Ubuntu, Fedora, openSUSE and CentOS
Creating a TMX MapCreating new maps and levels is really easy with Tiled. The following tutorial will show how to create maps and use some fancy Tiled features. Since we used Tiled in our sample application RunSnailRun, we will use the application we created as an example. First of all open Tiled and hit the “New” button in the top left corner. A window will pop up with your new map settings. Fig 2: New Map menu You can set how many tiles the map should have and how big those tiles should be. You should take into account that not all map sizes are possible and you should design your map at the beginning of writing your game. In RunSnailRun we used a map with the size of 42x22 tiles. This is 1260x660 pixels. We designed it so to leave some space for padding and the game logo which is displayed outside the map area. After you click ok you will see a new tiled map: Fig 3: New tiled map You now need to fill the map with tilesets (images) and objects. Just as in Cocos2d-x and in most graphical programs you build a map in Tiled using layers. The best approach is to use the layers to gather all the identical tilesets or all object that share the same properties. For example our map in RunSnailRun has a layer for the background and another layer for collision elements (lettuce). Snails and the hedgehog are of a different type, they are objects. At the start the first layer is already created. Its name is usually: Tile Layer 1. You can change the name by double clicking on it. After you change it to for example “Background” you can start filling it up. To do this you need to import some tilesets, which are just some images. - Open Map menu and then click “New Tileset”.
- Click Browse and find the image that you want to add.
- Click Ok.
On the right side in the Tilesets panel you will see that your image is imported. You can now select the tiles and place them on the map. On the top panel you will find many useful options like: - Stamp Brush: This option will cause placing only one tileset on the map.
- Bucket Fill Tool: With this option set you will fill the whole map with the specified tileset.
- Eraser: This will erase the selected tile.
- Rectangular select: You can use this to select an area so that all the modifications will only be applied inside this area
After you create the background you can also add some collision objects on the map, so the player will not be able to walk all around the map. You can do this in two ways. In the first approach you can create a collidable layer in which you will place all the tilesets like rocks, rivers, trees that will be collidable. Cocos2d-x can read the tiles’ positions from specified layers and you can check if the player wants to move onto a collidable tile and you can stop him. The other way is to create one layer for each type of terrain, so there will be a layer of trees, a layer of rocks, etc. You will then create another, separate layer with a transparent tileset. You can specify which tiles are not to be crossed by the player by placing transparent tilesets on these tiles. In RunSnailRun there is only one type of collision object, the lettuce. That is why we decided that there will be no additional layers. We created one level called “collidable” and placed the lettuce inside this level. As mentioned before, the snails and the hedgehog are objects. This means that they are not displayed as images, but they store the position and some properties of the element. In our application we place snail objects and the hedgehog object on the map and then using Cocos2d-x we read their position and create sprites. In order to create an object layer in Tiled you need to open the Layer menu and click “Add Object Layer”. You now set the name for the object layer. In our case we created two objects layers, one for snails and the other for the hedgehog. After you create the object layer you can create objects. By now it should look like this: Fig 4: A map created with Tiled comprised of two tile layers and one object layer You now need just to save the map and place it somewhere inside your game folder.
Using TMX maps in Cocos2d-xIn Cocos2d-x there is a special class that allows you to load the TMX file as a map. Furthermore, this class has some additional functions that help deal with the TMX map properties. It can access layers, single grids and read their properties. Here is a code snippet from the RunSnailRun application on how to load a map generated by the Tile application: classes.maps.TiledMeadow = cc.TMXTiledMap.extend({ ctor : function() { this._super(); this.initWithTMXFile("images/tiledMeadow.tmx"); }});var tiledMap = new classes.maps.TiledMeadow();
As you can see the TiledMeadow class extends TMXTiledMap and loads the tiledMeadow.tmx file when created. When you add a tiledMap object to a layer the map you created, it will be displayed, but only the tile layers will be displayed. Object layers such as snails will not appear neither will there be any mechanism for checking the collision against the lettuce. You must do it yourself. Here is how we have done it in our sample application. After we loaded the TMX file we can use some existing functions to read the map properties. For example we can read all the collidable tiles and create rectangles that reflect them. initObstacles : function() { this.obstacles = []; var mapWidth = this.getMapSize().width; var mapHeight = this.getMapSize().height; var tileWidth = this.getTileSize().width; var tileHeight = this.getTileSize().height; var collidableLayer = this.getLayer("collidable"); var i, j; for (i = 0; i < mapWidth; i++){ for (j = 0; j < mapHeight; j++){ var tileCoord = new cc.Point(i, j); var gid = collidableLayer.getTileGIDAt(tileCoord); if(gid) { var tileXPositon = i * tileWidth; var tileYPosition = (mapHeight * tileHeight) - ((j+1) * tileHeight); var react = cc.rect(tileXPositon, tileYPosition, tileWidth, tileHeight); this.obstacles.push(react); } } }}
Cocos2d-x allows you to access any layer from the map just by calling the getLayer() function with the name of the layer that you want to check. You can also access the grids inside the layer using the getTileGIDAt() function to which you must pass the position of the grid. We iterated through the whole map and using the aforementioned functions we checked where the “collidable” tiles are. After finding each collidable tile we created rectangles that will later be used for collision detection. Using a similar approach we read all the snails’ positions. Here is the code snippet: initSnails : function() { if (this.tiledMap) { var objectGroupSnails = this.tiledMap.getObjectGroup("snails"); var objectSnails = objectGroupSnails.getObjects(); this.numberOfSnails = objectSnails.length; var that = this; objectSnails.forEach(function(objectSnail) { var snail = new classes.sprites.Snail(); snail.setPosition(new cc.Point(objectSnail.x, objectSnail.y)); that.snails.push(snail); that.addChild(snail, 1); }); }}
This time we used the getObjectGroup() function to access the group containing all the snails. We iterated through each snail from this list. For each snail we read its position by referring to the x and y parameter on the tiled map and created a sprite and placed it on the Cocos2d-x layer on the same position. In the same way we also placed the hedgehog on the Cocos2d-x layer. Collision detectionAll snails and the hedgehog are now displayed according to their position defined on the TMX map created by Tiled. The next problem is that when all those animals will start moving they will walk wherever they want. They will walk into each other and nothing will happen. We need some kind of collision detection mechanism. This problem was already described in the previous article (Cocos2x-html5 game framework in Tizen applications: Follow-up), but I will repeat myself for the sake of article consistency. I will also extend the collision detection with new cases. Since we already have rectangles reflecting collision objects (lettuce) and we can easily create rectangles for snails and the hedgehog we can use all these rectangles to check if they intersect each other when the objects on the map move. In the main game loop during objects movement we can check if any of these rectangles collide and trigger some action, for example if a snail rectangle will want to move onto a lettuce rectangle we can stop it. This is what the update function looks like in the RunSnailRun application: update : function(dt) { var that = this; this.moveAndCheckForObstacles(this.hedgehog, dt); this.snails.forEach(function(snail) { that.moveAndCheckForObstacles(snail, dt); }); this.collisionDetection();}
As you can see we try to move the hedgehog and snails and we check if they bump into any obstacles which in this case are heads of lettuce. In order to check if an object runs into an obstacle we use the moveAndCheckForObstacles function: moveAndCheckForObstacles : function(object, dt) { var newPosition = object.move(dt, this.keyboardArrows); var newReactangle = cc.rect(newPosition.x+2 - object.width / 2, newPosition.y+2 - object.height / 2, object.width-4, object.height-4); if (!this.isCollisionInArray(newReactangle, this.tiledMap.obstacles)) { object.setPosition(newPosition); }}
This function is very simple and works as follows: - It tells the object to calculate its new position.
- It creates a new rectangle, using the acquired position, defining where this object would be after its movement.
- It calls the isCollisionInArray function to check if this new rectangle would collide with any of the rectangles defined in an array (in this case this is the array with all the heads of lettuce created when the TMX map was loaded).
- If there is no collision it sets the object on the new position.
The isCollisionInArray function takes two arguments: an object and an array. It iterates through the array and checks whether any item from the array collides with the passed object by calling the Cocos2d-x function cc.rectIntersectsRect. It looks like this: isCollisionInArray : function(item, array) { for (var i = 0; i < array.length; i++) { if (cc.rectIntersectsRect(item, array[i])) { return true; } } return false;}
All the objects added in the object layer using the Tiled application will collide against the heads of lettuce. You can change the position of the lettuce and all these mechanisms should still work. SummaryThe Tiled Map Editor is a very useful and simple tool that lets you create TMX maps. You can create objects and define the properties for objects and layers and you use these properties in a game engine, such as Cocos2x-HTML5. If you are creating a game application you should really consider using the Tiled application.
| 
 发表于 2013-10-8 20:48:02
